Showing posts with label anime. Show all posts

Friday, August 19, 2016

Princess Serenity (Sailor Moon) Cosplay Light Up Dress - Part I

Princess serenity light up dress coplay tutorial


I'm a strong believer in quality over quantity, which is why I'm a one-cosplay-a-year kind of gal.  I knew I wanted more electronics in my next project, but was lacking inspiration. Then I saw the piece of Sailor Moon fan art.
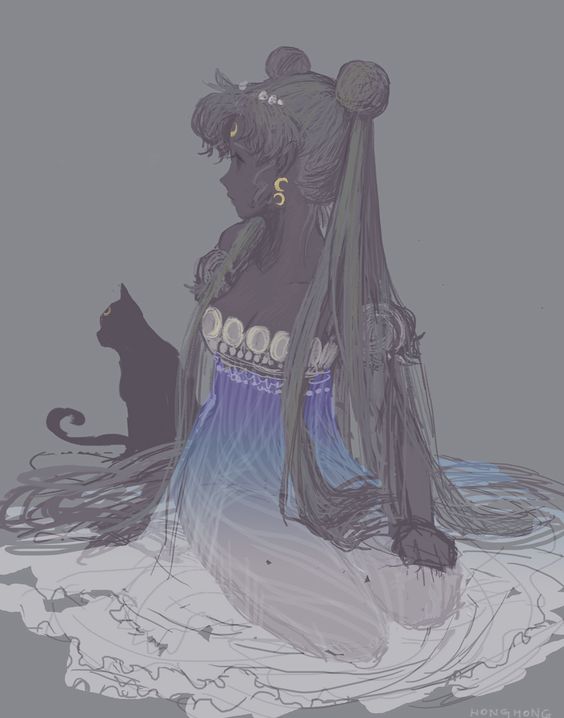
sailor moon fan art blues

 I was captivated by the color in it. I knew what I wanted: to recreate those soft hues in lights.  I was also inspired to flip it thanks to this piece of fan art by Keah. It took six months from concept to completion. Here's where I ended up (view the rest on my DeviantArt page):


This is a three part series of how I constructed my Sailor Moon Crystal Princess Serenity Light Up Dress Cosplay.
Part I - The Dress
Part II - The Sleeves
Part III - The Overlay and Accessories (Coming Soon)

What was your dress pattern?

The good news is that Serenity's dress is a very simple pattern. The bad news is I was struggling to find a version with minimum modifications. Lucky for me Sailor Crafty has a great article on how she made her NeoQueen Serenity dress that includes her pattern number.  THANK YOU!


NeoQueen Serenity's dress is more of a silhouette than Princess Serenity's empire waist ballgown, so I added two panels up front to give it flow. The train in the back is cut short to keep my lights off the floor. Also, I bet I would trip a bunch on it.
The triangles were my two additional panels
The fabric is a heavier weight, non-stretch cotton to help support the weight of the lights. Admittedly, I was still working on those logistics but I knew light fabric would likely sag in the wrong places.

What lights did you use?

I had two guiding principles for this cosplay:
1) It must good with the lights on or off
2) The lights must be visible in daylight and evening

Principle number one is a topic for part III. Principle number two meant a lot of light tests. My first thought was NeoPixels by AdaFruit.  I ordered a Gemma starter pack to play with the lights.

The NeoPixels were amazing! They are bright! They can be any color! They are easy to program! But they are expensive and they can be hot to the touch. I needed something requiring less money and skill.


Left side:fairy light test; Right side: Neopixel test

Christmas lights! That's cheap and already on a string! Amazon yielded few results for battery powered christmas lights but they did have lots of 'fairy lights'. They're small LED lights on copper wire and often are battery powered. I ordered a pack to test -- Winner!
fairy lights white
Typical 'fairy lights' - 7-10ft with a battery pack
The lower dress is composed of 28 feet of led lights - 14 ft blue and 14ft of purple. Total light cost was under $30.
I did have to solder together 2 packs of each lights and redo the solder points already on the strand. All solder points were coated in clear nail polish to prevent shorts from the wires touching. The light strings were soldered to an AdaFruit Gemma to regulate voltage  and provide an on/off switch. (Yes, a gemma is overkill for those functions. No, I don't care because it was simple.)
Light repairs with the help of my dad.
I used alligator clips for a very long time to make sure everything was right. 

How did you get the lights in the dress?

I flipped the fan art to have the lights 'trickling down' from the middle of the dress and exploding at the bottom. The new design would allow for me to load batteries at the bottom of the dress for easier placement and access while I'm in it.


 I laid out the bottom half and sketched my lights outline with a fabric pen. Then I pinned the final lines I liked the most.

The right side shows where I sketched my light lines.
The left is the first string of blue lights pulled through. 
Electronics are fickle. If I sewed the lights on, I would have to remove and restitch every time there was an issue. (There were a lot of issues at first). The solution was a combination of fabric tubes and ribbon that I could run the lights through. I used tubes for the first line to hold the lights up, then progressed to ribbon hooks for lower levels, and ended with sheer ribbon for the very bottom.
Unlit dress showing the light support system.
The purple lights are the ones encased in shear ribbon. Being on the bottom, I was afraid of snag and wanted to protect them more. The ribbon does it job perfectly but it was very difficult to string the lights through because I didn't provide enough gaps to pull the lights.

Two strings of lights in!
All the lights in and on!
Where did you hide the power for all this?
Like I mentioned above, the light strings were soldered to an AdaFruit Gemma to regulate voltage to 3volts and provide an on/off switch. Here's what that looks like sewn into the dress.


The velcro is the strip of fabric I use to cover and protect the gemma. By having all the wires hook up to this one gemma, I can connect a battery via jst or a micro-usb. The battery pack sits in the pouch sewn in below the gemma. 

I purchased a li-poly 2500mAh battery on my favorite site for power. 


And the rest of the dress....?
The rest is very straightforward. I sewed the top and the lining according to the directions. I did add more boning than the original pattern (six pieces instead of four) to prevent the front from collapsing. The real story for the rest of the dress comes in part III where I cover the beading and chiffon overlay.

Dress base complete!
What issues would you avoid your second time?
I spent two months researching and testing before I started to build. That wasn't an issue, but not needing that much R&D would make this project go faster!

I would use more fabric tubes and less ribbon to support my lights. I had enough dress scrap to make more, yet I hesitated to cut it in case I made a bigger oops.

The top of the dress kept concaving in after I placed all the beads on. My sister*, a textiles major, quickly pointed out I needed more boning. I wish I placed that additional boning in before I did beading and my liner.

My lights kept shorting at the start, which was really frustrating. My dad*, an electrical engineer, quickly pointed out that my wires at the solder points were touching and causing the short. Clear nailpolish is working, but I wish I had smaller heat shrink.

*Never underestimate the good advice of friends and family when working on a cosplay, regardless of their cosplay level or participation.


Final dress with lights on, minus the chiffon overlay.


Thanks for your interest! Don't forget to come back for parts II and III for the rest of build!


Thursday, June 13, 2013

Why every cosplay should have a professional photograph

You've labored and spent hours on creating your costume. It's like your own masterpiece when it's done! I recognize the amount of effort it takes to make those outfits, props and accessories that go into it so reward yourself with a professional photography session.

A professional photographer is going to be able to capture you in the moment of being your character, not you stressing to run back into the shot after hitting the timer. Not to mention, they're a professional! The skill these guys have with a camera is going to make you look even better.

Allow me to demonstrate my point. Here is a picture of me taken by my sister at Anime Weekend Atlanta in my first cosplay, Shura from Blue Exorcist with another cosplayer.


It's not perfect or the best Shura cosplay. Heck, I know I'm not built the same way as she is. The photo is good, but that's about it.

Now here's the same costume, same girl, but with a professional.


Quite a difference! If you're going to take the time to make a costume, spend the extra bucks to take photos to preserve your work. It's a great memento to look back on as you make your next costume!

* Professional photography taken by Pixlette Photography.

Tuesday, April 23, 2013

After the Con: Improving for the Next Time

I am no cosplay expert. I've only done this twice! But I have done a few events in my time and, in a way, prepping for con is like a mini-event to me.

So like any trip or activity I do, I write pre-event and post-event notes. I feel a little silly when I'm doing it, but I always turn back to them and thank myself. Between anime conventions you may forget that you are low on hairspray or that a buckle came undone. Don't struggle to remember - write it down!

Record Your Supplies Before the Event
Lists should be your best friend in all aspects of your life. I list all the supplies I need to pull for each con and costume. No detail is too small. Write down every brush, piece of make-up, and back-up item. I actually put it all in a box a few days prior, but the list helps to gather my thoughts. Then, you can look back at your list after the event to note if you ran low on a supply or maybe you didn't even need it.


Google Docs Is Your Friend
Taking the lists a step further, I share my musings in Google Docs with my con friends to cross-check supplies. That way, you don't have 5 bottles of hairspray but forget the eyeshadow. The Google Doc is also easy to find the next time around so you don't have to recreate your lists each time. The magic of the internet means the list is always with you as well; no losing a piece of paper.

If you want to take your list planning a step further, include the food and hotel room supplies in that google doc. That way, you never leave your Moogle Hat at home by mistake.


Improve As You Go
You know you'll have some downtime at con, so write down your costume comfort level then. It's easiest to remember what works when you're still wearing it! Yes, you've done test runs, but never for six hours and now you're noticing that your skirt is slipping after two hours of wear. Make those notes for minor (or big) improvements along the way to avoid the issue next time.
You can even list those items in your google doc from your smart phone. Genius!

Read Your Notes
The most important step in this process is reading your notes. None of this matters if you don't use it, so be sure to follow up with yourself. I've had many "ah-ha" moments when reading my post-con notes. Now you look professional, prepared, and ahead of the game each year by simply writing a note.


Saturday, March 16, 2013

Tina Tiny Cosplay: Another Compartment in the Blog

As my interests expand, so does this blog! I have not given up on hiking or bentos, I just keep adding more! I also find that I am a better writer when it's warm outside and it was certainly nice out today.

So today I am expanding the blog to include some of my cosplay, specifically Tina Tiny of Borderlands. I premiered the costume at Momo Con last week. This was my first time attending this con and I had a blast! If you live within a few hours of Atlanta, I highly suggest attending this growing anime convention.

Tiny Tina is certainly my favorite character from Borderlands 2. I knew I wanted to cosplay as her as soon as I saw her. I have limited sewing skills so this was a great first sewing project for me since it's okay to not have straight lines - it's the post-apocalypse world.

The costume took about 2 months as a weeknight side project. My sister and mom have incredible crafting skills and were able to teach me tricks along the way. The Tiny Tina cosplay would not have happened without them so thank you! On to the pictures.


Yay Tiny Tina cosplay!


Tiny Tina is ready to go! I made sure the front pouch would be functional so I could keep my cards and a few make-up supplies with me. Since I was solo at this con, I would not have another person to hold my stuff.


Another view on the make-up. Most of the supplies I got on e.l.f. super cheap. Even better, it is great quality. 


I even found other Borderlands characters! Handsome Jack and a psycho ran into me at the start of the day.