Tuesday, October 18, 2016

Thanks, DragonCon! and Cosplay lessons I learned

This year was one of the best DragonCon events ever! I credit the cooler weather and great friends to my experience.

You always learn something new about yourself and your cosplay after several hours of wear. My lights Princess Serenity dress will be returning to the repair shop before Anime Weekend Atlanta. Here's what I learned to help you with avoiding these mistakes in your build.

This was a hands-on cosplay.
As in, I always was carrying my dress in my hands. I knew my dress was long and space is a commodity so there would be a lot of holding while walking. I did not estimate the difficulty of walking while holding my dress and a drink (a DragonCon staple, in my opinion). I also had to hold it up more chiffon very high to prevent accidental dress smashing.  I will investigate adding some holds to the dress for easier crowd navigation.


** Update! By shortening my chiffon train, it was much easier to move in a crowd. I also practiced holding my dress up so I could move in a crowd. Practice makes perfect.

I drain batteries...fast.
This could have easily been a charing mistake, but I ran through three battery packs in one night of wear. My first battery is a li-poly battery that's 3.7volts/2500mAh. After that I had the quick phone rechargers for backup (5volts/5000mAh). I think the phone rechargers are pushing too much too fast. Also, those phone rechargers did not fit in my battery pocket. I placed them in my purse and had a very visible wire show.  I'll add a second pocket that is tube shape to hold those in place. Good news is those tubes fit perfectly in my wristlet purse!


** Update! I purchased a larger battery size and made sure to charge everything the night prior. Between the extra cell size and adding a switch (see below) I only used two batteries for the entire 12 hour day.

My arms change size.
I never added the elastic band to my sleeve puffs as they stayed on fine in the house. They moved around a bit more when I was dancing all night. I've made a mental note to complete that part of the cosplay for a better fit.


Sharing your cosplay character's name is confusing.
My name is also Serena. I was often confused the first minute or two of conversation when people called me Serena and I wasn't sure if they were talking to me the real person or about the character me. It made it hard for me to know when it was a friend or a random person calling me from across the room.

I need a better switch.
While I certainly could reach my on/off switches, it was a bit of pain. I liked turning the dress off when in panels (distracting) and when in outside light (waste of batteries). I resolved to have a switch I could access without bending over backwards to hit it.

New butt switch!
** Update! Using some JST extenders, I hooked up a switch at my hip. I ran wiring and switch through a fabric tube that I sewed to the back. Now I can turn my lights on/off with a butt tap.

Wednesday, August 31, 2016

Princess Serenity (Sailor Moon) Light Up Dress - Part II: The Sleeves


I know it may seem strange to break out the sleeves into their own post when I covered the entire dress construction in the previous post. My approach on writing is the time spent on parts and I spent DAYS constructing the sleeves. They deserve some time in the spotlight.

This is a three part series of how I constructed my Sailor Moon Crystal Princess Serenity Light Up Dress Cosplay.
Part I - The Dress
Part II - The Sleeves
Part III - The Overlay and Accessories (Coming Soon)

How did you cut your fabric?
Sewing circles is my enemy. I never like it and circles don't like me. My goal was to have sleeves that had a flat back for easy sewing, but a circle front I could puff out with some stuffing. I really liked the approach over at My Cute Bow for creating an elastic white band around your arm that you attach your sleeve puff to.

I made a circle with tails that I could overlap to sew together. See?

From finished cut to template
I created the circle template first to find my ideal puff size. After several drafts with paper towels, I determined how large the spirals/tails needed to be in order to overlap.

How did you do your loops?
Princess Serenity's sleeve design mimics a greek column scroll in all versions of the dress.


A popular cosplay approach is to roll the fabric into a ball to create the lines. This looks fabulous and adds depth to the sleeves. However, I wanted to stay closer to Sailor Moon Crystal which has gold scrolls. I tried painting the scrolls, but it looked flat. I even experimented with outlining the paint in metallic gold thread, but it wasn't the look I imaged. Break out the ribbon!

Fabric test with painted scrolls and start of thread outline. Not bad, but not what I was looking for.
I created a template scroll to lay the fabric over while I pinned the ribbon into place on the sleeves. The ribbon had wire in it; a big help to keep it holding shape. Then I would go back and sew the section. This way, I had less pins to prick me while I worked. It took one to two hours to lay and sew each scroll.
Ribbon attached to the circle finally!
How did you get the lights to only show on the gold scrolls?
My original plan was to have no lights in the sleeves. Once you start adding lights, you want more. I remember from light tests with the front circles (boob circles as some friends called them) that craft foam would block light.
My Serenity foam piece to block light in unwanted places.


Like a crazy pumpkin pattern, I cut the scroll pattern out of the foam pieces. To check the cut, I would pin the foam to the sleeve and shine a light through the bottom. A glass coffee table was very handy for this process.
Foam is pinned into place to make sure the cuts are the correct width before gluing down.
How would I attach this without showing? Turns out that E600, when applied in light layers, does not show like hot glue. The foam piece is enclosed already with no where to go. I only needed enough stick to hold it in place. This part took around one hour per sleeve.

What lights did you use?
I had plenty of white fairy lights left from my front piece. I cut stripes for each sleeve front that contained 4 lights I could bury in the stuffing.

A few led lights rolled into a circle. Ready to go in the sleeves!
 It was important to not put the lights right up against the scrolls to avoid uneven lighting. The stuffing it helps to diffuse the glow evenly across the entire scroll. Each scroll is independent so there are four lights per scroll for a total of 16 lights across the sleeves

Light it up! Sleeves with lit golden scrolls
How are you powering that?!
Thank the cosplay gods for that Sailor Moon Crystal sleeve design! In Crystal, you can see you have two circles, front and back, with a rectangle connecting the two pieces. The rectangle even folds out a bit and has little flaps! I created a pouch between the two circles that the batter could live in. A two coin cell battery holder powers each sleeve.

Sleeve before covering up the battery. I sewed a pocket to help keep things in place.


What would you have done differently?
Glue!! I was afraid to glue the ribbon down because I thought it would show in the lights. I did some testing with glue towards the end and noticed it did not show though. I could have been using it the whole time. Test early and test often.

I also should have done more to insulate my solder points. The tails on the circle allow me to only undo a few stitches to get into the electrical wiring. A good call in hindsight as I had to go into one scroll twice for repairs.

That's it for part II! I'll wrap up the final post after Dragon Con.

Friday, August 19, 2016

Princess Serenity (Sailor Moon) Cosplay Light Up Dress - Part I

Princess serenity light up dress coplay tutorial


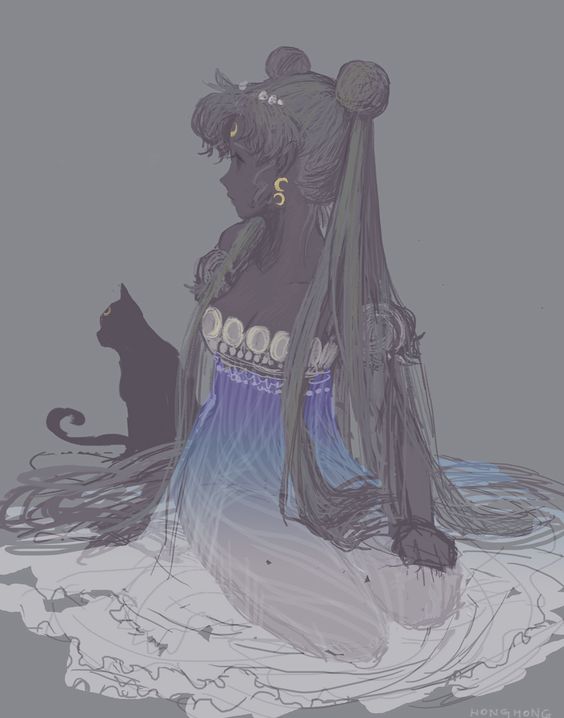
I'm a strong believer in quality over quantity, which is why I'm a one-cosplay-a-year kind of gal.  I knew I wanted more electronics in my next project, but was lacking inspiration. Then I saw the piece of Sailor Moon fan art.
sailor moon fan art blues

 I was captivated by the color in it. I knew what I wanted: to recreate those soft hues in lights.  I was also inspired to flip it thanks to this piece of fan art by Keah. It took six months from concept to completion. Here's where I ended up (view the rest on my DeviantArt page):


This is a three part series of how I constructed my Sailor Moon Crystal Princess Serenity Light Up Dress Cosplay.
Part I - The Dress
Part II - The Sleeves
Part III - The Overlay and Accessories (Coming Soon)

What was your dress pattern?

The good news is that Serenity's dress is a very simple pattern. The bad news is I was struggling to find a version with minimum modifications. Lucky for me Sailor Crafty has a great article on how she made her NeoQueen Serenity dress that includes her pattern number.  THANK YOU!


NeoQueen Serenity's dress is more of a silhouette than Princess Serenity's empire waist ballgown, so I added two panels up front to give it flow. The train in the back is cut short to keep my lights off the floor. Also, I bet I would trip a bunch on it.
The triangles were my two additional panels
The fabric is a heavier weight, non-stretch cotton to help support the weight of the lights. Admittedly, I was still working on those logistics but I knew light fabric would likely sag in the wrong places.

What lights did you use?

I had two guiding principles for this cosplay:
1) It must good with the lights on or off
2) The lights must be visible in daylight and evening

Principle number one is a topic for part III. Principle number two meant a lot of light tests. My first thought was NeoPixels by AdaFruit.  I ordered a Gemma starter pack to play with the lights.

The NeoPixels were amazing! They are bright! They can be any color! They are easy to program! But they are expensive and they can be hot to the touch. I needed something requiring less money and skill.


Left side:fairy light test; Right side: Neopixel test

Christmas lights! That's cheap and already on a string! Amazon yielded few results for battery powered christmas lights but they did have lots of 'fairy lights'. They're small LED lights on copper wire and often are battery powered. I ordered a pack to test -- Winner!
fairy lights white
Typical 'fairy lights' - 7-10ft with a battery pack
The lower dress is composed of 28 feet of led lights - 14 ft blue and 14ft of purple. Total light cost was under $30.
I did have to solder together 2 packs of each lights and redo the solder points already on the strand. All solder points were coated in clear nail polish to prevent shorts from the wires touching. The light strings were soldered to an AdaFruit Gemma to regulate voltage  and provide an on/off switch. (Yes, a gemma is overkill for those functions. No, I don't care because it was simple.)
Light repairs with the help of my dad.
I used alligator clips for a very long time to make sure everything was right. 

How did you get the lights in the dress?

I flipped the fan art to have the lights 'trickling down' from the middle of the dress and exploding at the bottom. The new design would allow for me to load batteries at the bottom of the dress for easier placement and access while I'm in it.


 I laid out the bottom half and sketched my lights outline with a fabric pen. Then I pinned the final lines I liked the most.

The right side shows where I sketched my light lines.
The left is the first string of blue lights pulled through. 
Electronics are fickle. If I sewed the lights on, I would have to remove and restitch every time there was an issue. (There were a lot of issues at first). The solution was a combination of fabric tubes and ribbon that I could run the lights through. I used tubes for the first line to hold the lights up, then progressed to ribbon hooks for lower levels, and ended with sheer ribbon for the very bottom.
Unlit dress showing the light support system.
The purple lights are the ones encased in shear ribbon. Being on the bottom, I was afraid of snag and wanted to protect them more. The ribbon does it job perfectly but it was very difficult to string the lights through because I didn't provide enough gaps to pull the lights.

Two strings of lights in!
All the lights in and on!
Where did you hide the power for all this?
Like I mentioned above, the light strings were soldered to an AdaFruit Gemma to regulate voltage to 3volts and provide an on/off switch. Here's what that looks like sewn into the dress.


The velcro is the strip of fabric I use to cover and protect the gemma. By having all the wires hook up to this one gemma, I can connect a battery via jst or a micro-usb. The battery pack sits in the pouch sewn in below the gemma. 

I purchased a li-poly 2500mAh battery on my favorite site for power. 


And the rest of the dress....?
The rest is very straightforward. I sewed the top and the lining according to the directions. I did add more boning than the original pattern (six pieces instead of four) to prevent the front from collapsing. The real story for the rest of the dress comes in part III where I cover the beading and chiffon overlay.

Dress base complete!
What issues would you avoid your second time?
I spent two months researching and testing before I started to build. That wasn't an issue, but not needing that much R&D would make this project go faster!

I would use more fabric tubes and less ribbon to support my lights. I had enough dress scrap to make more, yet I hesitated to cut it in case I made a bigger oops.

The top of the dress kept concaving in after I placed all the beads on. My sister*, a textiles major, quickly pointed out I needed more boning. I wish I placed that additional boning in before I did beading and my liner.

My lights kept shorting at the start, which was really frustrating. My dad*, an electrical engineer, quickly pointed out that my wires at the solder points were touching and causing the short. Clear nailpolish is working, but I wish I had smaller heat shrink.

*Never underestimate the good advice of friends and family when working on a cosplay, regardless of their cosplay level or participation.


Final dress with lights on, minus the chiffon overlay.


Thanks for your interest! Don't forget to come back for parts II and III for the rest of build!


Monday, July 25, 2016

Reading a hiking trail for your skill level

The hubs and I just returned from our annual vacation aka hike-a-thon. This time, we went out on a limb to Switzerland to visit the Bernese Oberland. It was GORGEOUS!!!

Ricky on the Eiger Trail

As an event coordinator, it was a scary leap of faith to leave the planning to a tour company to book our hotels and plan our hikes. We were provided a rough topographic map and detailed description of our hike, but we quickly found out this was not enough to prepare us. Hence today's post is about how to read a hiking trail for YOU.

-------------------

We live in Georgia where what we call mountains are considered small hills to people who live in the Rockies. For example, Arabia Mountain is typically considered a moderate trail.
Distance one way: 1.29 miles
Approx. elevation gain:150 ft

The slightly longer Panther Creek Falls trail is classified as a difficult trail.
Distance one way: 4.71 miles
Approx. elevation gain: 600 ft

Compare these two hikes to a difficult trail out west like Mono Pass in Yosemite:
Distance one way: 3.7 miles
Approx. elevation gain: 900 feet

The average elevation gain of Panther Creek is 127ft per mile while Mono Pass clocks in at 243ft per mile. Both rated as 'difficult', but offering very different experiences.

Once hikes hit the level of difficult to strenuous, it's a crap shoot. Here's a great example two hikes rated as strenuous with very different feels:

VS

Vernal Falls in Yosemite  Iceberg Lake in Glacier
Top of Vernal distance RT: 2.4 miles
Elevation gain: 1000 ft
Iceberg Lake distance RT: 9.7 miles
Elevation gain: 1275 feet

The average elevation gain for to Vernal Falls is 833ft per mile, a drastically different hike than the average elevation gain of 262ft per mile for Iceberg Lake.  What am I getting at here? My point is that you need to look beyond a hike's rating to determine if it's right for you.

Know Your Distance vs Elevation
I lead with those numbers so you understand my thoughts when I say this: hike ratings are meaningless. I don't consider walking 9 miles flat a strenuous hike. I can do distance all day. When you start to sprinkle in some elevation, you have my attention. But that's me! I've gotten moderate hike suggestions from people who causally mention a 2,000ft climb as a small challenge because that is their normal.

The hardest and most critical lesson in hiking is to learn your distance vs elevation max. No one can tell you but yourself. That baseline is critical for knowing what kind of hike you're about to get into.

Find the Elevation Profile
The most important piece of hiking information to me is now the elevation profile that illustrates how steep that climb is and how long it lasts. Topographic maps are another great option, if you have a good one and are skilled at reading it (I'm meh). See for yourself in these two examples from Jagat Jora Jaal.

Topographic map of Half Dome hike

Elevation profile of Half Dome hike

For our last vacation, we had the distance and elevation gain listed on all of our hikes if we didn't take any shortcuts, an okay topographic map, and the amount of time estimated for the hike. It's a start, but not the whole picture. Here's what I mean.  So one day we have great hike with a few small climbs spread out and the next day we're hiking straight up the side of a mountain face when I could have taken the train that's only 20 feet away. Be better than me; demand an elevation profile. 

Know Your Audience
If you can't find any information on a hike before tackling it (a rare event in the internet age), take a moment to reflect on who is providing you the information. Us Georgia folks are not use to mountains. Our trail ratings reflect that with almost any elevation gain on a trail earning it at least a moderate rating. I saw children running up mountains in Switzerland that I struggled to crawl up. Locals compare to what they know so its your job to scale a local's perspective to your experience. 


Sunday, July 10, 2016

Light it up! - Color changing wig flower for Princess Serenity

Blogging has taken a back-seat to cosplay construction this spring. I have a lofty goal of completing my Princesss Serenity cosplay (that fully lights up) by July 1. I'm a few days from goal and feeling on-track enough to take a break to blog a bit about it.

I hope to cover all aspects of this dress creation, but for now I'm starting with the simplest part. Sailor Moon's Princess Serenity often has a flower in her hair in manga and fan art. I wanted lots of lights and saw the flower as another opportunity.

Project Materials used:
Supplies needed:
  • Alligator clips
  • Soldering iron
  • Solder
  • Vice
  • Wire cutter
  • Wire stripper

New to electronics? I got my gear from Adafruit in Ladyada's Electronics Toolkit. Gave me everything I need for a great price.

The Build
Essentially, I sewed a neopixel attached to a Gemma into a flower. I'm not an electronics expert so I'm going to drop yet another link back to Adafruit. To learn all about neopixels, read their full guide.

I started by hooking up my gemma and neopixel via clips to work out the coding on the lights.

Wires everywhere! The neopixel hooked up to the gemma.

There's plenty of resource code in the Arduino library for color changing. I had to work out (with the help of my computer science husband) what colors I wanted to cycle and how fast to cycle them. I went with a six color rotation: blue, pink, purple, green, orange, white. Each color stays for around 5-7 second before taking another 5 seconds to shift to the next color.

The colors and timing is completely by feel. I spent around an hour tweaking both until I had a combination that I liked. I wanted it to shift fast enough that someone passing by would see the change, but slow enough that it doesn't look like a rave on my head. 


Flower color and placement testing.

Next, I started to sew/pin things into place. I knew I wanted the gemma on an outside petal so I could easily turn it on/off. The neopixel placement required more finesse. It can't go directly in the middle and shot out as that would just blind people. I conclude to put it towards the 'bottom' of the flower and shoot up through the petals. I sewed and cut the inside petals into better positions for the light. 

With positions marked, I took it all apart to solder the neopixel and gemma together. I ran the wire from my marked positions to get an idea for length, then added an inch. I don't want the wire too tight; I want it to flow.  


Flower with neopixel sewn in and gemma outside. Those are the thin, flexible wires from Adafruit.

The perk of using gemma and neopixels is that they are made for wearables, so you have these large pads you can sew though. I sewed the gemma and neopixel into place using the holes I did not solder. 

Gemma - sewable and small!

The gemma unit is on the 'top' of the flower. To hold down the petal hiding it, I used a small strip of velcro. The neopixel sits on the bottom of the flower. The wire to the pixel is all white so I can run it through the flower petals without bring attention to it. It meant for keeping careful track of things when soldering!


Wig Attachment

I feel like it's cheating on a Usagi wig as I knew I had buns that I could wrap the unit around. Another cheat was a lot of fan art with pearls wrapped around the buns. My theory was to make the flower a chain in a bracelet. I would hide a side release buckle behind smaller flowers to allow the unit to clip around the bun. 

The hair bracelet is embroidery floss with pearls and two small pink flowers, each near the larger white flower. One of the pink flowers hides the buckle I use to snap it in place.

My original plan was to make the battery unit a part of the bracelet with more flowers hiding it. However, I underestimated the weight of the coin batteries and had to make it a separate piece (but still attached because of wires and power - duh!)

I glued two more pink flowers on the top of coin battery pack to disguise it, then did a sew/glue combo on the bottom to attach a hair clip. The batteries now clip into my hair as extra decoration.

From the back, battery pack  helps to hide my natural hair color while powering the flower. 
The final result is a hairpiece that is sure to light up the night!


Friday, June 10, 2016

Trail Hydration - An expanding market

Living in Georgia, I know the importance of hydration. Double that on the trail. Triple that when you're backpacking. When I'm hiking, I love water. But as soon as I make camp, I'm desperate for a different beverage. Lucky for me, the market in instant drinks has exploded to my nearby Kroger.

Some like it HOT

I remember my fascination with the first instant coffee packs I saw years ago. We took them on our next backpacking trip and I never looked back. Now the market has expanded to have almost every variety of coffee-drink in small instant form.

Need to have cream and sugar in your coffee? Instead of stealing packets of sugar from your office, I like to bring a salt and pepper shake. This is my personal favorite from container store:
Of course, if you're not a fan of coffee, there are still plenty of options. I've been known to pack a hot chocolate packet and my husband enjoys tea. 

Ice Ice Baby

Prefer chiller beverages? I saw instant iced coffee the other day!


The market has also grown on flavoring your water. From Mio to Crystal Light (my personal favorite), you have plenty of options. Sport stores like REI and Dicks carry additional options in the form of fizzy tablets. Don't know which one to get? REI did an article about it.


Which drinks do you prefer?